Automatic Tea Serving System
ECE 5725 Project
Jiachen Lian & Yifan Yang
Demonstration Video
Introduction
Tea plays an important role in Chinese culture and is related to many aspects of Chinese literature, such as history, arts and religion. As a great part in people’s daily life, we want to make having tea more convenient and enjoyable. This project is to provide more convenience for people who would like to get an experience of Chinese tea or even to provide spiritual pleasure for people. We implemented an automatic tea system which was able to serve tea for up to five people within the 180 degree field of view. People could place cups at any position alongside the “semi” plate. Once the system is booted, the tea pot will find where the cups are based on computer vision method and then pour tea until the cups are filled.
Project Objective
- Design a robotic arm to hold the teapot and pour the tea
- Use a camera to detect the teacups
- Once the camera detects a teacup, the robotic arm will serve the tea
Design
i. Overview
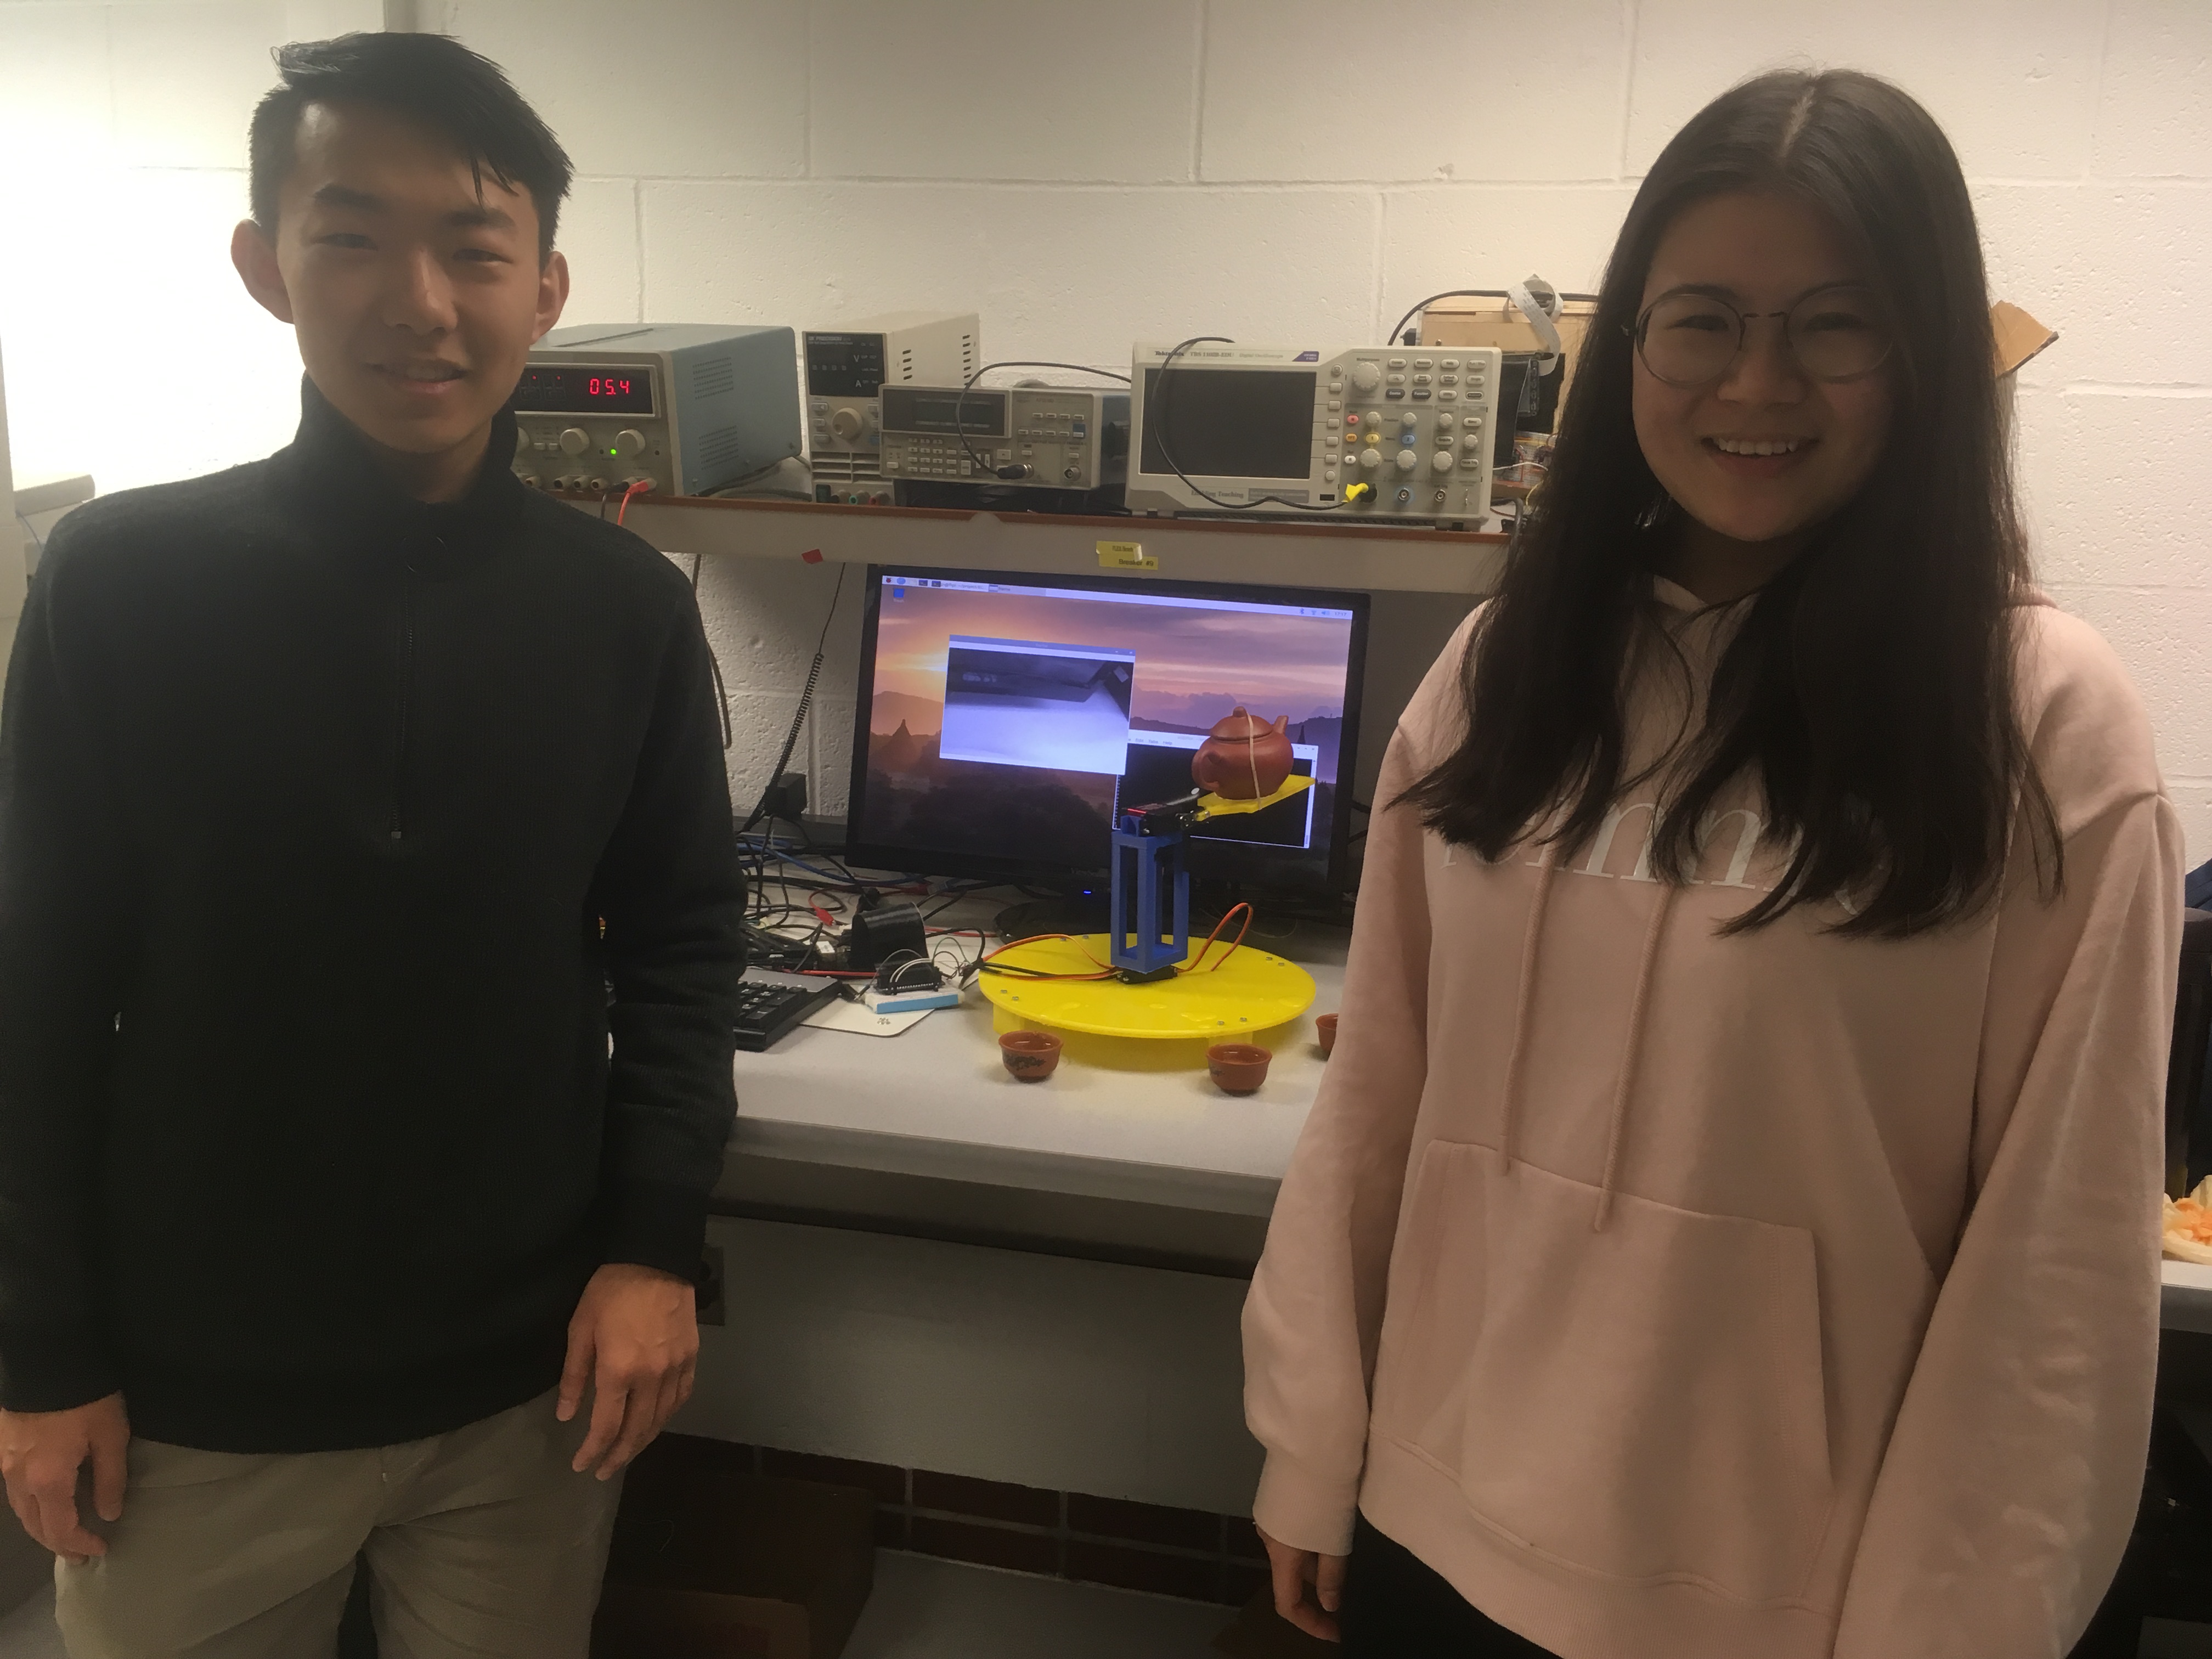
Our system shown below contains a yellow base with a servo attached to it and a supporting pole was fixed at the base servo and could be driven by the base servo. At the top of this supporting pole, another servo was placed and connected with a yellow platform. Our teapot was glued to this platform and the lid of the teapot was fixed to the teapot with a rubber band to make sure it would not fall out while tilting the teapot. Tea cups are placed randomly just alongside the yellow plate. Theoretically, people could place as many cups as they can. However, there are still several limitations. First, cup could not be placed too far away from the plate. Second, considering the servo could only rotate for 180 degrees, the “effective” area is just a “semicircle”. Third, although multiple objects detection methods are used, any two cups could not be too close to each other. Two servos are driven by GPIO output signal of Raspberry Pi. In programming part, one process is designed to control the camera, detect the object and another process is designed to control the tea pot. To increase the speed of camera image analysis, template matching method is used for cup detection.
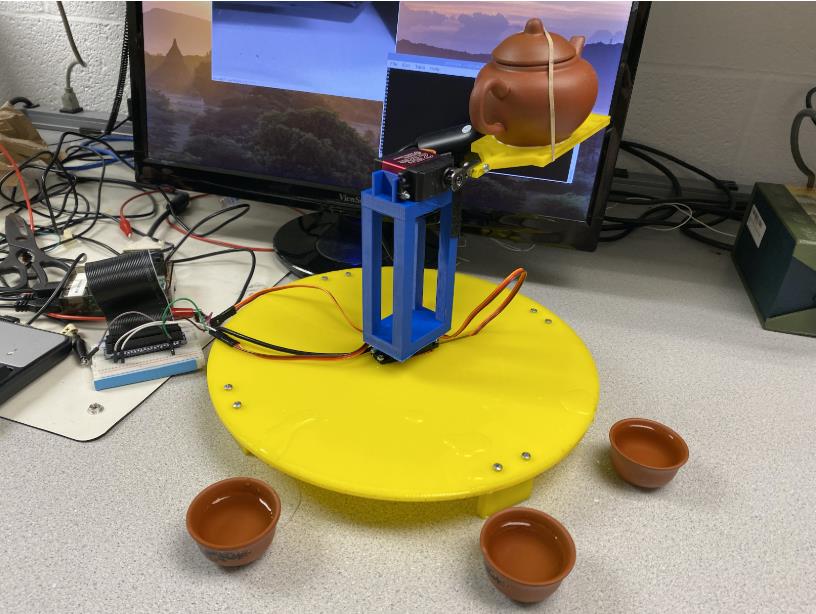
Fig 1
ii. Mechanical Design
The mechanical system consists of three main parts: yellow circle base, blue pillar part and yellow holding board, which are designed based on FreeCAD software. The blue pillar part is to hold one servo which is to drive the tea pot. This part is made through 3D print in Cornell’s RPL. Other two parts are produced through laser cut. Another servo is fixed in the center of yellow plate to let the whole device rotate. Four small pieces are connected to the yellow plate so that the plate could keep horizontal. The servo in the center is also connected with the bottom of the blue pillar through screws. The yellow holding part is also connected with the blue pillar through screws. Once these parts are combined, tea pot is glued onto the yellow holding board. Rubber band is used to fix the lid.
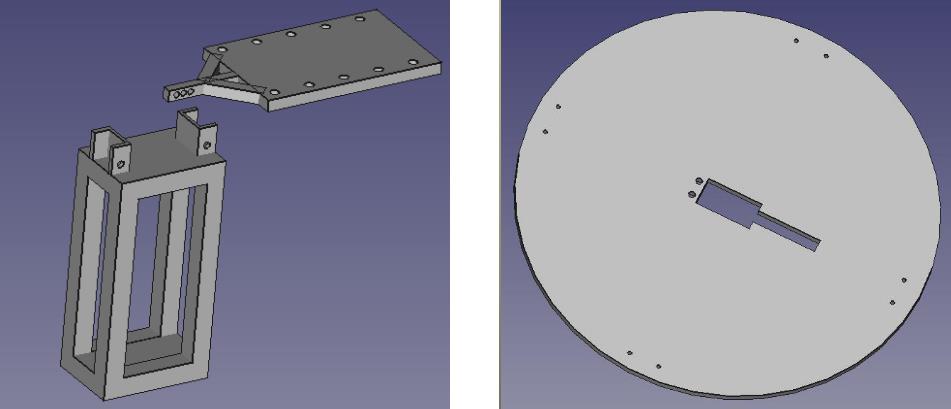
Fig 2
iii. Software and Electrical Design
Servo Control
We used two stepper servos to control the system and the servos were controlled by hardware pwm. The servo was powered by 5V external voltage and were connected to RPi’s GPIO pin 16 and 21. Let’s take the servo used to drive the supporting pole and camera as servo1 and the other one servo2. At the very first, software pwm was used to control the servo but while testing the servo’s behavior we found the supporting pole and the platform shake too much and sometimes they didn’t work as expected and we broke a holding platform due to this reason. After consulting professor, we decided to replace the software pwm with hardware pwm to reduce the noise from Linux OS and with hardware pwm. There’s another issue we found during the testing that every time we pour a cup of tea, the water level goes lower and if we spin the servo2 for the same degree next time, it’s likely that the water will not come out of the teapot. Our solution to this is to maintain a counter to count how many cups of tea we have filled and every time the counter increments, we need to increase the degree of rotation for the second servo. The electrical connection of the two servos and the RPi is shown below.
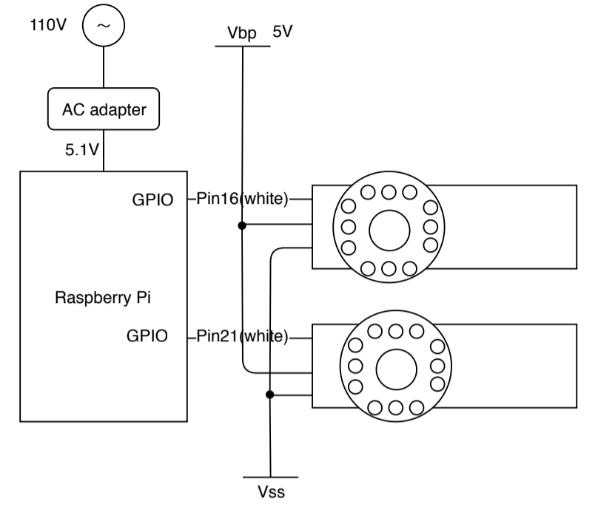
Fig 3
Tea Cup Detection
Given that our teacup detection is only a simple object detection and there is only one type of teacup in our project, there is no need to use complicated deep learning algorithms such as YOLO, mask RCNN, Faster RCNN. In addition, due to the high computation of deep learning method and CPU occupation, we finally went back to the template matching algorithm). OpenCV provides a useful function, template matching, which takes an input image and finds a match to the template image. It provides six methods to do the matching and we chose the CV_TM_CCOEFF_NORMED due to the fast speed it has. We took a picture of our teacup and used this as a template(just as Fig 4) to be matched with the frames captured from video stream.
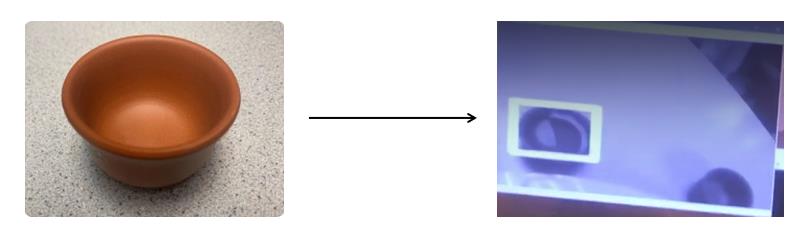
Fig 4
To avoid the situation that when there’s no teacups in the field, the program still recognizes some other things as a teacup, we set a threshold of 0.60 for the return value of template matching function. All the matching results under this threshold were discarded and only the ones over this threshold would be recognized as effective teacups. After we assembled the whole system and tested it with the spinning supporting role, there came another issue that after one pour, the camera could not move away immediately and the template matching process would continuously detecting the same teacup and repeat the pouring. Our solution to this problem is to add a time delay so that the camera would not recognize the cup again in 15s after the previous detection. Furthermore, multi-object detection method is also applied so that even two cups are close to each other, the system could still recognize the cups properly.
There was also an issue of the OpenCV installation with Python3 we came across at the beginning of this project, but we followed the instruction in reference[] and found the packages successfully had it installed and imported in Python3.
Multiprocess Issue
In our design, we need to rotate the supporting pole and at the same time detect the teacups. In order to make these two tasks happen at the same time and communicate with each other because we need the results of the camera detection to decide the servos’ behavior. There are three methods to do this. One is using multi-threading/multi-processing in one single Python program to allow them to run together and use a global queue to share data (which is similar to a pipe). Python provides a multi-processing package to allow several processes to run on different cores and share data. We developed a Python program and opened two processes in this single program, one is camera capture and recognition, the other one is servo control. We used a lock in the servo control process and whenever the camera detects a teacup and we acquire a lock and let the servo2 rotating only without any other tasks running at the same time.
The second method is to make a FIFO and we let the camera teacup detection program run at background and write detection results (teacup coordinates) into this FIFO and at the same time we run the servo control program and read data from the FIFO and decides its behavior according to the coordinates. This method had the same issue as the above multi-process one that the camera continuously capturing the same teacup. Our solution to this using the FIFO is that once we detect a teacup, we set the coordinates to (0,0) and close the FIFO file to stop reading coordinates from the FIFO. And the third method to realize the communication of two tasks is to use tcp transaction. We can make one process serve as a message publisher and another one serve as a subscriber and set up a connection between them to send/receive messages through ip. This is technically feasible but we didn’t try this one. We tried the first two methods and they all worked but we finally chose the multi-processing one considering that we could make the CPU work more efficiently by distributing tasks to four cores on Raspberry Pi. The complete control flow of our system is shown in figure below.
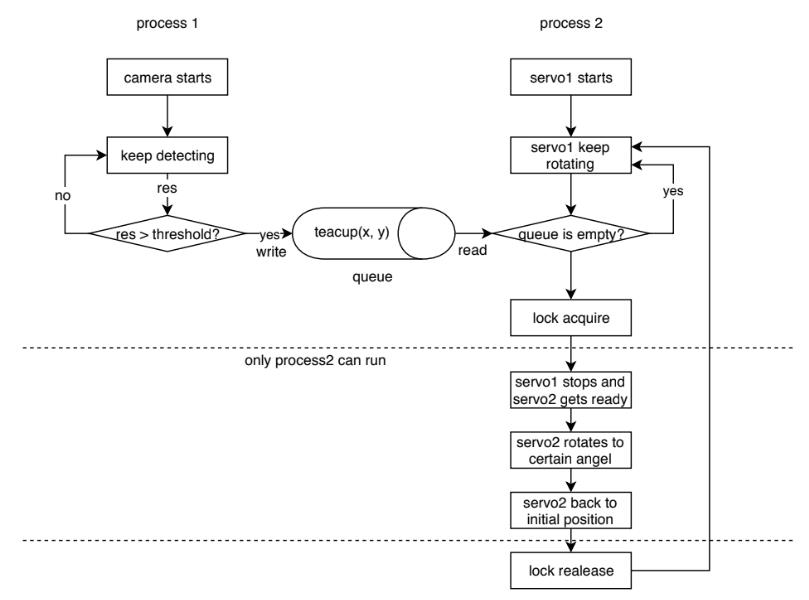
Fig 5
Testing and Results
Starting with the testing of teacup detection and the servo controller, we tested our system parallelly and incrementally. After these two main functions passed our tests, we moved on to the system testing. We assembled the whole system and then tested the endurance of the components such as the holding platform and the torque of the servo. After that, we tested the amount of water that should be added into the teapot initially and we did a lot of experiments on the distance that the teacup should be placed away from the base. Also, we experimented with the angels that servo2 should rotate to to make sure the tea could be properly poured into the cup with the least leakage. After all these tests, the system worked well and we demoed smoothly.
Conclusion
Through this project, we leveraged the knowledge we’ve learnt from lectures and also we tried many new things such as mechanical design, stepper motors, hardware pwm etc. One of the biggest challenges me met was that we were both total strangers to mechanical design and CAD tools, so it took us such a long time to design and modify our robotic arm again and again but we found this procedure fun and fruitful and the time spent on the mechanical design was totally worth it. It was a really nice experience to finish this design from the most primitive sketch to the final working system. Though some of the initial plans were not able to be done due to the limited time, we learned a lot from this project and had great fun with it.
Future Work
For now, we controlled the amount of water that is poured into the teacup by trial and error and this is not practical enough in many scenarios so we consider using an ultrasonic distance sensor/weight sensor to monitor the water level/amount in the teacup so that we could stop whenever the teacup is about to be full. Apart from this, we were planning to use speaker recognition to recognize who wanted some tea and then served tea for this person. We implemented this speaker recognition application but were not able to integrate it into our project due to some practical issues such as the low recognition rate (probably because of the noise in the lab and the record quality of the microphone) and the limited time. In the future, we can consider integrating this into this project.
Work Distribution
Jiachen Lian
jl3945@cornell.edu
Mechanical design, OpenCV, multi-processing.
Yifan Yang
yy887@cornell.edu
Servo control, OpenCV, FIFO.
Group Caption
12/13/2019
References
PiCamera DocumentPigpio Library
R-Pi GPIO Document
OpenCV Install on Raspberry Pi
Template Matching Method
Code Appendix
#-------------------------------------------------------------------------------
# Name:        main.py
# Purpose:     lab code
#
# Author:      Yifan Yang & Jiachen Lian
# Team ID:     yy887_jl3945
#
# Created:     12/15/2019
# Lab Section:   Monday
# Course:     Design with Embedded Operating System(ECE5725)
#------------------------------------------------------------------------------

from multiprocessing import Process,Lock,Queue
import os
import cv2 as cv
import numpy as np
import subprocess
import RPi.GPIO as GPIO
import time
import pigpio
import wavePWM

cup1 = 0
cup2 = 0

def pot_rotate():

    p2_hw = pigpio.pi()
    if not p2_hw.connected:
       exit(0)

    pwm2 = wavePWM.PWM(p2_hw) # Use default frequency
    pwm2.set_frequency(50)
    pos = 0
    pwm2.set_pulse_start_in_micros(21, pos)
    for i in range(2500, 2000, -1):
        if(i == 2004):
            pwm2.set_pulse_length_in_micros(21, 2500)
            pwm2.update()
            break
        pwm2.set_pulse_length_in_micros(21, i)
        pwm2.update()
    print('b')

def camera(q, flag, curtime, count):

    global cup1
    global cup2
    cap = cv.VideoCapture(0)
    while(True):
        if((int)(time.time()) - curtime > 25):
            flag = True

        # Capture frame-by-frame
        ret, frame = cap.read()

        # Our operations on the frame come here
        gray = cv.cvtColor(frame, cv.COLOR_BGR2GRAY)
        img = gray
        img2 = img.copy()

        template = cv.imread('mycup.jpg',0)
        w, h = template.shape[::-1]
        meth = 'cv.TM_CCOEFF_NORMED'

        img = img2.copy()
        method = eval(meth)
        # Apply template Matching
        res = cv.matchTemplate(img,template,method)
        threshold = 0.60
        loc = np.where( res >= threshold)
        cent_x = 0
        cent_y = 0
        for pt in zip(*loc[::-1]):
            cv.rectangle(img, pt, (pt[0] + w, pt[1] + h), 255, 1)
            if pt[0] > cent_x:
                cent_x = pt[0]
                cent_y = pt[1]

        print(cent_x)
        if(cent_x >= 300 and cent_x <= 340):
          print('d')
          if(flag):
            q.put(cent_x)
            flag = False
            print(flag)
            print("####")

            curtime = (int)(time.time())
        cv.imshow('frame',img)

        if cv.waitKey(1) & 0xFF == ord('q'):
            break

def servo(q,lock,flag,curtime,count):
    global cup1
    global cup2
    p1_hw = pigpio.pi()

    if not p1_hw.connected:
       exit(0)

    pwm = wavePWM.PWM(p1_hw) # Use default frequency

    pwm.set_frequency(50)
    pos = 0
    pwm.set_pulse_start_in_micros(16, pos)
    pwm.set_pulse_length_in_micros(21, 0)
    pwm.update()

    for i in range(2500, 500, -6):

        pwm.set_pulse_length_in_micros(16, i)
        pwm.update()
        time.sleep(0.1)
        if q.empty():
            pwm.set_pulse_length_in_micros(16, i - 40)
            pwm.update()
            continue
        m = q.get()
        print(m)
        print('c')

        lock.acquire()

        pwm.set_pulse_start_in_micros(21, 0)

        j = 2500
        jj = 2100 - 50 * count
        count += 1

        while(j >= jj):
            pwm.set_pulse_length_in_micros(21, j)
            pwm.set_pulse_length_in_micros(16, 0)
            pwm.update()
            j = j - 1
        while (j <= 2500):
            pwm.set_pulse_length_in_micros(21, j)
            pwm.set_pulse_length_in_micros(16, 0)
            pwm.update()
            j = j + 1
            time.sleep(0.1)

        pwm.set_pulse_length_in_micros(21, 0)
        pwm.update()
        time.sleep(1)
        print('b')
        print('a')
        i -= 40
        pwm.set_pulse_length_in_micros(16, i)
        pwm.update()
        lock.release()

    for i in range(500, 2500, 5):
        pwm.set_pulse_length_in_micros(16, i)
        pwm.update()
    p1_hw.stop()

if __name__ == '__main__':

    q = Queue(4)
    #q.put(0)
    lock = Lock()
    flag = True
    curtime = 0
    count = 0
    p2_hw = pigpio.pi()
    if not p2_hw.connected:
       exit(0)

    pwm2 = wavePWM.PWM(p2_hw) # Use default frequency
    pwm2.set_frequency(50)
    pos = 0
    pwm2.set_pulse_start_in_micros(21, pos)
    pwm2.set_pulse_length_in_micros(21, 2500)

    pwm2.update()
    time.sleep(1)
    pwm2.set_pulse_length_in_micros(16, 2500)
    pwm2.update()
    p2_hw.stop()
    time.sleep(15)
    pc = Process(target=camera, args=(q,flag,curtime,count))
    ps = Process(target=servo, args=(q,lock,flag,curtime,count))

    pc.start()
    ps.start()
    pc.join()

    ps.terminate()